Fonte : https://www.informaticapertutti.com/
PREMESSA
Questa guida è rivolta soprattutto a chi mette le mani per la prima volta nel suo pc, per questo le varie procedure verranno spiegate in maniera molto semplice e con parole molto comuni.
PRIMA DI PARTIRE
Partiamo con un po’ di teoria. In un pc, sfruttando la connessione EIDE possono essere collegate al massimo 4 periferiche (hard disk, masterizzatori, lettori ecc.)
In questo corso vedremo passo passo i materiali necessari per aggiungere un nuovo hard disk, le precauzioni da tenere presenti, e le configurazioni da controllare ed eventualmente modificare per far funzionare la nostra nuova unità.
MATERIALI E PRECAUZIONI
Per aggiungere un nuovo hard disk innanzitutto è opportuno controllare di disporre dello spazio all’interno del case e di un collegamento sul cavo IDE….
Apriamo quindi il case (l’involucro del PC) e controlliamo. Il modo di apertura varia a seconda dei modelli, alcuni hanno le viti di fissaggio, altri sono ad incastro.
All’apertura del case vedremo una serie di componenti simili a quelli mostrati in figura
Il cavo IDE è il cavo piatto grigio (anche se oggi se ne trovano di rotondi) cui sono collegati disco fisso e CDROM già presenti (ad esempio)….lungo il cavo ci sono degli agganci per le unità….se ne abbiamo una libera possiamo inserire uno nuovo hard disk e collegarlo a tale presa del cavo, altrimenti dobbiamo acquistare un nuovo cavo (costa pochi euro).
Ogni cavo IDE viene collegato oltre che sull’unità di interesse, anche alla scheda madre come mostrato in figura…
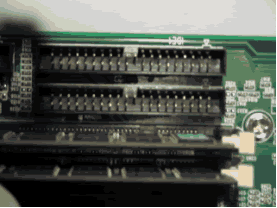
La figura mostra due agganci per i due canali IDE…chiamati rispettivamente IDE1 e IDE2
Ogni cavo ha il suo ingresso e ad ogni cavo vengono collegate al massimo 2 unità
Infatti questi cavi grigi hanno tre connettori, uno va collegato alla scheda madre in quegli attacchi che si vedono nella prima foto, gli altri due sono per le due periferiche.
Inoltre al momento dell’acquisto di un hard disk, probabilmente esso ci verrà fornito ricoperto in una busta antiurto senza null’altro; assicuriamoci di avere anche le viti di fissaggio o altrimenti richiediamole al venditore.
Se abbiamo tutto quanto sopra descritto, per eseguire il lavoro ci servirà in più solamente un cacciavite a croce medio.
Ricapitoliamo un attimo e mostriamo ciò di cui abbiamo bisogno con l’aiuto di una foto di una hard disk
Come possiamo vedere ogni hard disk dispone delle seguenti aree
-
Area blu, ATA cable per il collegamento con il cavo piatto di cui parlavamo
-
Area rossa, per il collegamento del Jumper per le impostazioni MASTER / SLAVE
-
Area gialla, per il connettore che porta all’ alimentazione per acquisire l’energia necessaria all’unità
COME AGGIUNGERE UN NUOVO HARD DISK (EIDE)
SECONDA PARTE
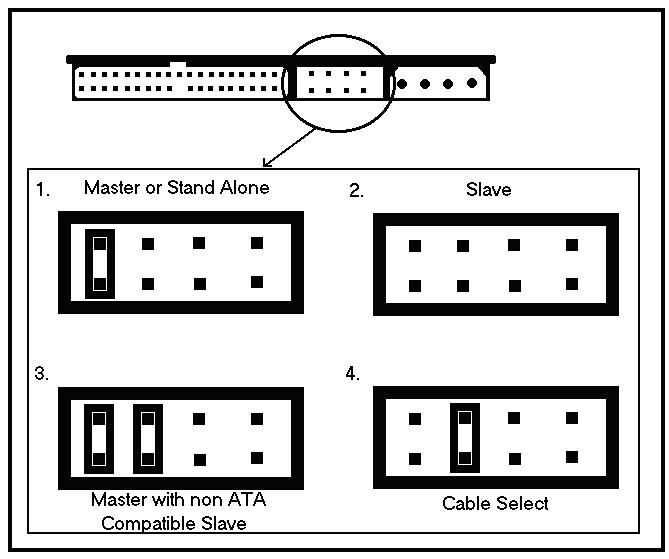
Controlliamo le impostazioni: Importante a questo punto è controllare le impostazioni MASTER / SLAVE… esse specificano sostanzialmente le unità primarie e secondarie collegate ad ogni cavo IDE… Se ci fai caso dietro ad ogni unità, che sia hard disk o CDROM, c’è un pezzo di plastica piccolino con tre file di piedini a coppia come mostrato in figura …
sopra all’unità in questione vi è una dicitura che parla di MASTER / SLAVE / e altro…le diciture ti indicano dove mettere quel piccolo pezzo di plastica (jumper) in una di queste coppie di piedini per far si che sia riconosciuto come MASTER o SLAVE… vediamone un esempio…
Confrontando le prime due foto, possiamo notare come la legenda riporti esattamente la struttura dei piedini del disco fisso…
In ogni caso diciamo che ci indica esattamente come disporre il jumper affinché l’unità venga riconosciuta come Master o come Slave a seconda del nostro bisogno
Ora…in conseguenza della configurazione attuale bisogna spostare il jumper nella posizione libera…mi spiego meglio…per gli Hard disk è sempre meglio prediligere il collegamento al MASTER ma è possibile collegarlo anche come SLAVE purchè ci sia posto….Ammettiamo ad esempio di avere un canale IDE1 con collegato il disco fisso come MASTER e il CDROM come SLAVE…in tal caso volendo collegare un altro disco fisso, dovremo metterlo sull’altro canale IDE, l’IDE 2….controlliamo e,sempre per esempio, vediamo che sull’IDE 2 c’è collegato solo un masterizzatore cone SLAVE….ok…possiamo mettere quindi il nostro disco fisso come MASTER sull’IDE 2…nel caso opposto chiaramente faremo l’inverso..
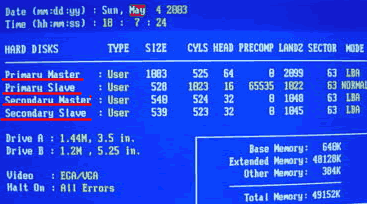
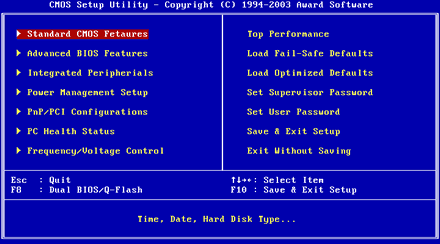
Ora la domanda sarà…”dove troviamo la configurazione attuale ?” Semplice….o controlliamo visivamente i jumper delle unità presenti, oppure entriamo nel bios, nella prima voce…dovremo vedere un elenco delle unità installate con scritto se sono MASTER o SLAVE
TERZA PARTE
Inseriamo anche uno schema esplicativo di tutto il discorso fatto sull’IDE
Nello schema si riassume che i canali IDE sono 2, ogni canale collega la scheda madre alle unità interne (CDROM, Hard disk, masterizzatori ecc.) tramite un cavo (per lo più cavi piatti)
Ad ogni canale possiamo collegare 2 unità, per cui in totale 4.
Nello schema è rappresentata una situazione tipica dove avendo già il canale IDE 1 occupato da un disco fisso e un CDROM, dobbiamo porre il nostro nuovo hard disk sul canale IDE 2…lo poniamo come Master dato che la posizione è libera e i dischi fissi è sempre meglio metterli come Master…la Slave dell’IDE 2 la lasciamo libera…
Ora prima di iniziare ricapitoliamo ancora una volta il concetto sinora esposto
-
Abbiamo controllato di avere tutto a portata di mano, disco fisso, viti per fermarlo, cavo piatto disponibile
-
Abbiamo controllato le impostazioni attuali sul BIOS e abbiamo capito come impostare i jumper per la nuova unità da inserire
A questo punto possiamo iniziare
IMPORTANTE !!!
Quando operate controllate di non avere addosso indumenti che possano accumulare molta carica elettrostatica (indumenti sintetici, di lana ecc), evitate di lavorare sopra un tappeto e evitate di toccare i componenti elettronici con le dita. Prima di partire toccate con entrambe le mani la carcassa metallica del computer, così scaricherete a terra eventuali cariche elettrostatiche.
Ora spegnete il pc, scollegate tutti i connettori che si parte!
Apriamo il case e controlliamo come già detto se c’è un cavo IDE con una posizione libera o meno…se non c’è colleghiamo il cavo che abbiamo acquistato (vedi sopra) una parte al connettore della scheda madre…l’altra parte all’unità da aggiungere…
Ora settiamo il nuovo hard disk come spiegato in precedenza utilizzando i ponticelli presenti sul retro del disco e il jumper.
A questo punto prendiamo il nostro nuovo hard disk e lo inseriamo nel suo spazio apposito…praticamente verrà alloggiato sopra o sotto a quello già presente a seconda dello spazio libero all’interno del case…
Nella foto vediamo la nostra situazione attuale:
l’hard disk già esistente collegato insieme al masterizzatore tramite il cavo grigio.
Ricordiamoci di fissarlo al case con le apposite viti.
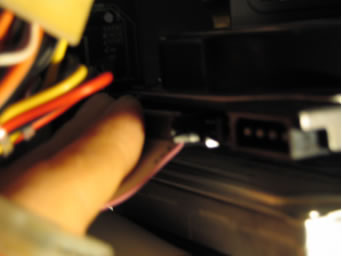
Perfetto, ora dobbiamo collegargli il cavo grigio. Ha un verso: noterete che da un lato ha una striscia colorata di rosso: quella va rivolta verso il lato dello spinotto dell’alimentazione (che sarebbe quello più piccolo con cavi colorati rossi e gialli).
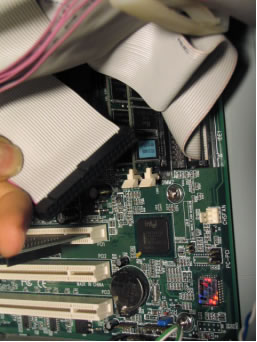
Collegato il cavo al disco lo dobbiamo collegare alla scheda madre. Avete l’esempio nelle 2 foto.
Ora dobbiamo collegare lo spinotto dell’alimentazione e non c’è rischio di sbagliare: può essere inserito solo nel suo connettore … non lo si può mettere alla rovescia.
A questo punto abbiamo finito.
Attenzione perchè è facile che per collegare le piattine al disco fisso, o a forza di tirare il cavo piatto o altro, esso si scolleghi dalla scheda madre….per cui attenzione perchè anche un piccolo falso contatto determinerà la mancata individuazione dell’unità aggiunta e delle altre probabilmente.
Una raccomandazione, tutti i fili dentro al case dovrebbero stare un po’ lontani dalla ventola del processore, per facilitarne lo scambio di aria. Controlliamo di non aver lasciato niente dentro al case, soprattutto viti, e chiudiamo il tutto.
Ricolleghiamo tutto, monitor mouse e tastiera per il momento….collegheremo tutto il resto solo dopo quando saremo certi che il disco appena aggiunto viene riconosciuto
Accendiamo il pc.
Riavviando il sistema, se tutto è stato installato correttamente nelle prime schermate nere di DOS, dopo il test della RAM, vengono individuate le periferiche….tutte…master e slave….assicuriamoci che nella posizione che cha abbiamo scelto (ad esempio MASTER Secondario) venga elencata la nostra nuova unità….Se cosi non fosse allora abbiamo sbagliato qualcosa…
Altrimenti il nuovo disco apparirà in risorse del computer. Se è nuovo formattiamolo cliccandoci sopra con il tasto destro da Risorse del computer e selezionando la voce formatta ed il gioco è fatto.
In questo esempio, come situazione di partenza avevamo solo due periferiche: un CDROM ed un hard disk (VEDI SCHEMA RIASSUNTIVO DEI CANALI IDE).
Poniamo ora il caso che all’interno del vostro pc ci fossero già tre periferiche, per esempio un hard disk, un lettore DVD ed un masterizzatore. Abbiamo detto che se ne possono avere al massimo quattro, quindi avremo già i due cavi grigi; uno tutto occupato, a cui sono attaccati che so, il masterizzatore e l’hard dik, nell’altro cavo c’è collegato il lettore DVD, mentre un connettore è libero.
Il nostro nuovo hard disk lo collegheremo allora nell’unico connettore rimasto libero. Qui diventa importante il discorso fatto prima sulla configurazione master e slave: il lettore DVD e il nostro nuovo hard disk sarebbero quindi collegati sullo stesso canale IDE, per cui uno deve essere impostato come primario (MASTER) e uno come secondario (SLAVE). Una volta capito il meccanismo non è difficile giostrarsi tra le varie configurazioni…
Una volta fatto tutto nel modo giusto, dovremo andare dentro Windows….talvolta capita che l’hard disk non venga visualizzato, cosi che l’utente potrebbe avere l’impressione che il disco sia collegato male… .
Se abbiamo Win XP e l’hdd è nuovo , andiamo in pannello di controllo–> strumenti di amministrazione->gestione computer->gestione disco e li potremo vedere l’hard disk aggiunto. Facciamo clic sopra di esso con il tasto dx del mouse ed inizializziamolo, facendolo cosi vedere correttamente al sistema che sarà in grado di utilizzarlo in risorse del computer. A questo punto dobbiamo formattare il disco nel modo che preferiamo (per Win95/98/ME formattare in FAT32, per Win 2000/XP/2003 formattare in NTFS).
PREMISE
This guide is especially aimed at those who put their hands for the first time in their pc, for this the various procedures will be explained in a very simple way and with very common words.
BEFORE LEAVING
Let’s start with a little theory. In a PC, using the EIDE connection, a maximum of 4 peripherals can be connected (hard disks, burners, readers, etc.)
In this course we will see step by step the materials needed to add a new hard disk, the precautions to keep in mind, and the configurations to be checked and possibly modified to make our new unit work.
MATERIALS AND PRECAUTIONS
To add a new hard disk, first of all you should check that you have space inside the case and a connection on the IDE cable …
We then open the case (the PC case) and check. The way of opening varies according to the models, some have fixing screws, others are interlocking.
When opening the case we will see a series of components similar to those shown in the figure
The IDE cable is the gray flat cable (even if today there are round ones) to which are connected hard disk and CDROM already present (for example)… .long the cable there are hooks for the units…. If we have one free we can insert a new hard disk and connect it to that cable socket, otherwise we have to buy a new cable (it costs a few euros).
Each IDE cable is connected not only to the unit of interest, but also to the motherboard as shown in the figure …

The figure shows two hooks for the two IDE channels… called IDE1 and IDE2 respectively
Each cable has its input and a maximum of 2 units are connected to each cable
In fact, these gray cables have three connectors, one must be connected to the motherboard in those attacks that are seen in the first photo, the other two are for the two peripherals.
In addition, when purchasing a hard disk, it will probably be supplied covered in a shockproof envelope without anything else; make sure we also have the fixing screws or otherwise request them from the seller.
If we have all the above, to perform the work we will only need a medium Phillips screwdriver.
Let’s recap a moment and show what we need with the help of a photo of a hard disk
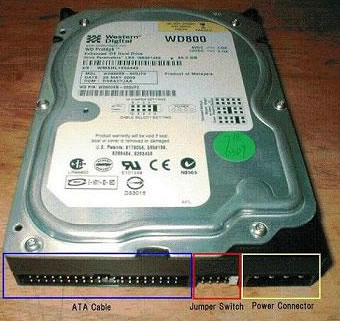
As we can see, each hard disk has the following areas
Blue area, ATA cable for the connection with the flat cable we were talking about
Red area, for connecting the Jumper for MASTER / SLAVE settings
Yellow area, for the connector that leads to the power supply to acquire the energy needed by the unit
HOW TO ADD A NEW HARD DISK (EIDE)
SECOND PART
Let’s check the settings: It is important at this point to check the MASTER / SLAVE settings … they basically specify the primary and secondary units connected to each IDE cable … If you notice it behind each unit, be it hard disk or CDROM, there is a small piece of plastic with three rows of feet in pairs as shown in the figure …
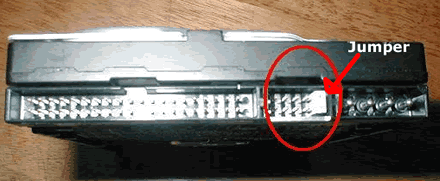
above the unit in question there is a wording that speaks of MASTER / SLAVE / and more … the wordings tell you where to put that small piece of plastic (jumper) in one of these pairs of feet to make it recognized as MASTER or SLAVE … let’s see an example …
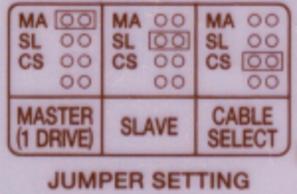
Comparing the first two photos, we can see how the legend shows exactly the structure of the legs of the hard disk …
In any case we say that it indicates exactly how to arrange the jumper so that the unit is recognized as Master or Slave according to our need
Now … as a consequence of the current configuration you have to move the jumper to the free position … let me explain better … for the Hard disks it is always better to prefer the connection to the MASTER but it is also possible to connect it as a SLAVE as long as there is room …. We admit for example to have a IDE1 channel with connected the hard disk as MASTER and the CDROM as SLAVE … in this case wanting to connect another hard disk, we will have to put it on the other IDE channel, IDE 2 …. we check and, again for example, we see that on the IDE 2 there is only a SLAVE burner connected …. ok … we can then put our hard disk as MASTER on IDE 2 … in the opposite case we will clearly do the reverse ..
Now the question will be … “where do we find the current configuration?” Simple …. or visually check the jumpers of the units present, or enter the bios, in the first item … we will have to see a list of the units installed with the writing if they are MASTER or SLAVE
PART THREE
We also insert an explanatory scheme of all the discussion made on the IDE
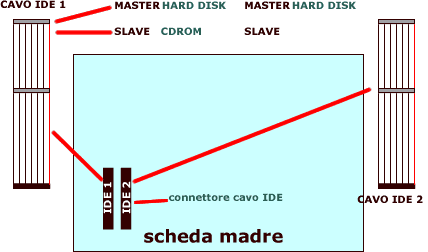
The diagram summarizes that the IDE channels are 2, each channel connects the motherboard to the internal units (CDROM, Hard disk, burners etc.) via a cable (mostly flat cables)
We can connect 2 units to each channel, so a total of 4.
The diagram shows a typical situation where having already the IDE 1 channel occupied by a hard disk and a CDROM, we have to put our new hard disk on the IDE 2 channel… we place it as Master since the position is free and the hard disks are always better put them as Master … the Slave of IDE 2 we leave it free …
Now before we begin, let’s recap the concept we have hitherto exposed
We checked that everything was close at hand, hard disk, screws to secure it, flat cable available
We checked the current BIOS settings and figured out how to set jumpers for the new drive to be inserted
At this point we can start
IMPORTANT !!!
When working, make sure that you are not wearing clothing that can accumulate a lot of electrostatic charge (synthetic clothing, wool, etc.), avoid working on a carpet and avoid touching the electronic components with your fingers. Before leaving, touch the metal casing of the computer with both hands, so you will discharge any electrostatic charges to the ground.
Now turn off the PC, disconnect all the connectors that you start!
We open the case and check as already said if there is an IDE cable with a free position or not … if there is not connect the cable that we purchased (see above) one part to the connector of the motherboard … the other part to the unit to add …
Now we set the new hard disk as explained above using the jumpers on the back of the disk and the jumper.
At this point we take our new hard disk and insert it in its space … practically it will be housed above or below the one already present depending on the free space inside the case …
In the photo we see our current situation:
the existing hard disk connected together with the burner via the gray cable.
Remember to fix it to the case with the appropriate screws.
Perfect, now we have to connect the gray cable to it. It has a line: you will notice that on one side it has a red colored strip: the one must face the side of the power plug (which would be the smaller one with red and yellow colored cables).
Once the cable is connected to the disk we have to connect it to the motherboard.
You have the example in the 2 photos.