Il mancato rilevamento di un’unità disco rigido interna da parte del BIOS di sistema può essere determinato da cinque problemi:
-
Cavo dati difettoso
-
Unità non alimentata (non gira)
-
Impostazione errata dei jumper sull’unità
-
Capacità del disco rigido non supportata dal BIOS
-
Unità disco rigido guasta
NOTA: Le sezioni 1, 2, 3 e 5 si riferiscono a PC o a sistemi Macintosh. La sezione 4 si riferisce solo ai PC.
Dopo avere verificato che la vostra porta ATA o SATA è impostata ad Auto-Detect o è abilitata, e se l’unità disco rigido non viene rilevata (automaticamente) dal BIOS di sistema, le procedure indicate di seguito possono essere utili per identificare/risolvere il problema.

-
Cavo dati difettoso
Il BIOS non è in grado di rilevare un disco rigido se il cavo dati è danneggiato o se il collegamento non è corretto. Il modo più facile, per verificare che il cavo è il problema, è sostituirlo con un altro cavo. Se il problema persiste, allora il cavo non era la causa del problema. Per unità ATA, Seagate è consigliabile utilizzare un cavo UDMA lungo al massimo 45 cm. I cavi UDMA dispongono di connessioni con codifica a colori che devono essere orientate correttamente durante il collegamento. Il connettore blu è sempre dedicato alla connessione con la scheda madre. Il connettore grigio centrale viene utilizzato per i dispositivi Slave sul cavo. Il connettore nero viene utilizzato per il collegamento di dispositivi Master. Controllare sempre che la scheda madre e le connessioni del disco rigido non presentino pin piegati o non allineati. Se i cavi dati vengono piegati, strozzati, schiacciati o corrugati, possono verificarsi rotture dei conduttori all’interno dell’isolamento, che non risultano visibili esternamente. In caso di dubbi sulla condizione di un cavo dati, sostituirlo.

Immagine di un cavo dati Ultra ATA.
Per cavi SATA, Seagate raccomanda di utilizzare cavi più lunghi dei 12 pollici, ma più corti di 39.37 pollici (1 metro). Per ulteriori informazioni, consultare l’articolo con Risposta ID: 182453 (in inglese).
-
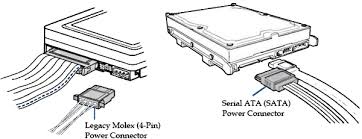
Unità non alimentata (non gira)
Se l’unità non è alimentata o riceve un livello di alimentazione inadeguato (12 v), non si avvia. Per stabilire se è questo problema a causare il mancato rilevamento dell’unità disco rigido da parte del BIOS, attenersi alla seguente procedura:
-
Con il sistema spento, aprire il case del computer e rimuovere il cavo dati dall’unità disco rigido. In questo modo viene interrotto l’invio di qualsiasi comando di “risparmio energia”.
-
Accendere il sistema. Verificare se il disco rigido gira. Toccando il lato dell’unità si dovrebbe avvertire una leggera vibrazione. Se non si sente girare il disco rigido, è necessario scoprire se l’unità è alimentata.
-
In alcuni casi occorre rimuovere l’unità dal case e tenerla fisicamente in mano. A causa della vibrazione e del notevole rumore prodotto dalle ventole del sistema, è molto difficile sentire il disco girare quando è montato.
-
Se si rimuove l’unità, è importante utilizzare una piattina di massa. Non alimentare l’unità a caldo. Tenerla in mano, collegare il cavo di alimentazione, quindi accendere il sistema.
-
Se l’unità non gira, visitare la Assistenza per garanzia e restituzioni.
-
Impostazione errata dei jumper sull’unità
È consigliato che tutti i dischi rigidi ATA Seagate che supportano l’opzione Cable Select per i jumper devono essere configurati come Cable Select. Nei computer prodotti prima dell’ottobre 1998 e che non supportano UDMA 66 o versioni successive, è necessario utilizzare le impostazioni Master/Slave.Quando si utilizzano le impostazioni Cable Select dei jumper, tutti i dispositivi collegati al cavo UDMA devono anch’essi utilizzare l’impostazione Cable Select. Quando sono utilizzate le impostazioni dei jumper Cable Select, il rilevamento dei dispositivi master/slave dipende dal cavo. Il connettore nero rileva sempre la periferica come Master, mentre il connettore grigio la rileva sempre come Slave. Per ulteriori informazioni, consultare la Risposta con ID: 196299.
Se avete una unità 3.0 Gbit/sec SATA che non viene rilevata dalla vostra unità di controllo di 1.5 Gbit/sec SATA o il vostro sistema va in stallo quando collegate l’unità a una unità di controllo di 1.5 Gbit/sec SATA, dove passare (usando i jumper) da una velocità di 3.0 Gbit/sec a una velocità più lenta di 1.5 Gbit/sec /sec affinche che il sistema riconosca correttamente l’unità disco. Per ulteriori informazioni sulla modifica dell’impostazione del jumper (cavallotto) rallentare la velocità di trasferimento della vostra unità SATA, fare riferimento allla Risposta con ID: 193775 (in inglese).
-
Capacità del disco rigido non supportata dal BIOS
NOTA: Questa procedura si riferisce solo unità ATA, dato che le unità di controllo SATA non hanno nesun problema di rilevare unità di disco SATA con capacità più grade.
NOTA: La seguente procedura può permettere a sistemi più vecchi di accedere a unità interne di capacità più grande, tuttavia essi saranno a una capacità ridotta. Per permettere all’hardware del vostro sistema di riconoscere la capacità completa dell’unità rigida, si raccomanda di aggiornate il BIOS del vostro sistema, o acquistate una scheda unità di controllo PCI ATA.
Per risolvere questi problemi, attenersi alla seguente procedura:
-
Riavviare il sistema ed entrare nel BIOS per impostare manualmente i parametri dell’unità. Per entrare nel BIOS generalmente occorre premere F1, F2 o CANC subito dopo l’accensione del sistema. Il tasto corretto da utilizzare è indicato in un messaggio visualizzato in questa prima fase dell’avvio.
-
Modificare i parametri del BIOS relativi all’unità passando da Auto-Detect a None oppure Off.
-
Salvare le impostazioni, uscire dal programma di configurazione e spegnere il sistema.
-
Salvare le impostazioni del BIOS e chiudere.
-
5. Ricollegare i cavi di alimentazione e ATA, accendere il sistema ed eseguire l’avvio di SeaTools per DOS CD o dal floppy di MaxBlast.
-
Quando il sistema eseguirà l’avvio caricando il programma SeaTools, premete “C” e quindi “Set Drive Size” (Imposta dimensioni unità).
-
Se non conoscete la capacità massima dell’unità il BIOS del sistema può gestirla, premete S per impostare il massimo a 32GB, che è un limite comune su sistemi più vecchi. Se conoscete la capacità massima, potete premere M per fissare il limite manualmente.
-
Una volta che avete modificato la capacità dell’unità e SeaTools per DOS la accetta, spegnete completamente il vostro sistema per cancellare qualsiasi informazione memorizzata nella cache. Se semplicemente riavvate senza spegnere completamente il computer, le modifiche di dimensione di unità possono essere perse.
-
Una volta riacceso il Pc, entrare nel BIOS di sistema e reimpostare i parametri delle unità su Auto-Detect.
-
Salvare le impostazioni, uscire dal programma di configurazione, riavviare il sistema operativo dal dico di installazione ed eseguire la procedura di installazione normale.
Impostazioni alternative: i passaggi 1 e 2 della procedura riportata sopra non funzionano su alcuni BIOS. In questi casi, il sistema continua a bloccarsi in fase di avvio oppure SeaTools per DOS non è in grado di rilevare l’unità dopo che il BIOS è stato impostato su None.
-
Provare a impostare i parametri del BIOS su un tipo definito dall’utente con 1.024 cilindri, 16 testine e 63 settori.
-
Impostare LBA su Normal, Standard o Disabled. Le opzioni Write Pre Comp (WpCom) e Landing Zone (LZ) possono essere impostate su zero.
-
Salvare le impostazioni, uscire dal programma di configurazione e spegnere il sistema.
-
Ricollegare i cavi di alimentazione e ATA, riavviare il sistema operativo dal dico di installazione ed eseguire la procedura di installazione normale.
-
Se SeaTools per DOS non rileva l’unità e sono state seguite le procedure per la risoluzione dei problemi indicate sopra, rivolgersi al produttore della scheda madre per ottenere un aggiornamento del BIOS oppure acquistare una scheda Ultra ATA PCI. Presso il negozio online di Maxtor all’indirizzo è disponibile una linea completa di schede Ultra ATA PCI che forniscono supporto per le unità con capacità elevata.
-
Unità disco rigido guasta
Se sono state eseguite tutte le verifiche e le procedure indicate in precedenza e continuano a verificarsi problemi durante l’installazione dell’unità o del sistema operativo, si consiglia di eseguire l’utilità di diagnostica SeaTools per DOS per stabilire se l’unità è difettosa. Se SeaTools per DOS restituisce un codice di errore, consultare la Assistenza per garanzia e restituzioni.
Failure to detect an internal hard drive by the system BIOS can be caused by five problems:
1. Defective data cable
2. Unit not powered (does not turn)
3. Incorrect setting of jumpers on the unit
4. Hard drive capacity not supported by BIOS
5. Hard drive failed
NOTE: Sections 1, 2, 3 and 5 refer to PC or Macintosh systems. Section 4 refers only to PCs.
After verifying that your ATA or SATA port is set to Auto-Detect or is enabled, and if the hard drive is not detected (automatically) by the system BIOS, the following procedures may be helpful in identifying / resolving the problem.
After verifying that your ATA or SATA port is set to Auto-Detect or is enabled, and if the hard drive is not detected (automatically) by the system BIOS, the following procedures may be helpful in identifying / resolving the problem.
Defective data cable
The BIOS cannot detect a hard drive if the data cable is damaged or if the connection is incorrect. The easiest way to verify that the cable is the problem is to replace it with another cable. If the problem persists, then the cable was not the cause of the problem. For ATA drives, Seagate is recommended to use a UDMA cable up to 45 cm long. UDMA cables have color-coded connections that must be oriented correctly when connecting. The blue connector is always dedicated to the connection with the motherboard. The central gray connector is used for slave devices on the cable. The black connector is used for connecting Master devices. Always check the motherboard and hard drive connections for bent or misaligned pins. If the data cables are bent, constricted, crushed or corrugated, breakages of the conductors inside the insulation may occur, which are not visible externally. If in doubt about the condition of a data cable, replace it.
Image of an Ultra ATA data cable.
For SATA cables, Seagate recommends using cables longer than 12 inches, but shorter than 39.37 inches (1 meter). For more information, see the article with Answer ID: 182453 (in English).
• Unit not powered (does not turn)
If the unit is not powered or receives an inadequate power level (12 v), it will not start. To determine if this problem is causing the BIOS to fail to detect the hard drive, follow these steps:
1. With the system turned off, open the computer case and remove the data cable from the hard drive. This stops sending any “energy saving” commands.
2. Turn on the system. Check if the hard drive is spinning. Touching the side of the unit you should feel a slight vibration. If you can’t hear the hard drive spinning, you need to find out if the drive is powered.
3. In some cases, the unit must be removed from the case and physically held in the hand. Due to the vibration and the remarkable noise produced by the system fans, it is very difficult to hear the disc spinning when mounted.
4. If you remove the drive, it is important to use a bulk strap. Do not heat the unit. Hold it in your hand, plug in the power cord, and turn on the system.
If the unit does not turn, visit Warranty and Returns Support.
• Incorrect setting of jumpers on the unit
It is recommended that all Seagate ATA hard drives that support the Cable Select option for jumpers should be configured as Cable Select. On computers manufactured before October 1998 and which do not support UDMA 66 or later, the Master / Slave settings must be used.
When using the Cable Select settings of the jumpers, all devices connected to the UDMA cable must also use the Cable Select setting. When the Cable Select jumper settings are used, detection of master / slave devices depends on the cable. The black connector always detects the peripheral as Master, while the gray connector always detects it as Slave. For more information, see Answer ID: 196299.
If you have a 3.0 Gbit / sec SATA drive that is not detected by your 1.5 Gbit / sec SATA control unit or your system stalls when you connect the unit to a 1.5 Gbit / sec SATA control unit, where to switch (using jumpers) from a speed of 3.0 Gbit / sec to a slower speed of 1.5 Gbit / sec / sec for the system to correctly recognize the disk drive. For more information on changing the jumper setting to slow down the transfer speed of your SATA drive, refer to Answer ID: 193775 (in English).
• Hard disk capacity not supported by the BIOS
NOTE: This procedure only applies to ATA drives, since SATA control drives have no problem detecting SATA hard drives with more grade capacity.
NOTE: The following procedure may allow older systems to access larger capacity indoor units, however they will be at a reduced capacity. To allow your system hardware to recognize the full capacity of the hard drive, it is recommended that you update the BIOS of your system, or purchase a PCI ATA controller card.
To resolve these problems, follow these steps:
1. Reboot the system and enter the BIOS to manually set the parameters of the unit. To enter the BIOS you generally need to press F1, F2 or CANC immediately after turning on the system. The correct key to use is indicated in a message displayed in this first phase of startup.
2. Change the BIOS parameters of the unit from Auto-Detect to None or Off.
3. Save the settings, exit the configuration program and turn off the system.
4. Save the BIOS settings and close.
5. 5. Reconnect the power and ATA cables, turn on the system and start SeaTools for DOS CD or from the MaxBlast floppy.
6. When the system starts up by loading the SeaTools program, press “C” and then “Set Drive Size”.
7. If you don’t know the maximum capacity of the drive, the system BIOS can handle it, press S to set the maximum to 32GB, which is a common limit on older systems. If you know the maximum capacity, you can press M to set the limit manually.
8. Once you have changed the capacity of the drive and SeaTools for DOS accepts it, shut down your system completely to clear any cached information. If you simply reboot without completely shutting down the computer, the drive size changes may be lost.
9. Once the PC is turned on again, enter the system BIOS and reset the unit parameters to Auto-Detect.
10. Save the settings, exit the configuration program, restart the operating system from the installation saying and carry out the normal installation procedure.
Alternative settings: Steps 1 and 2 of the above procedure do not work on some BIOS. In these cases, the system keeps crashing at boot time or SeaTools for DOS cannot detect the drive after the BIOS has been set to None.
11. Try setting the BIOS parameters to a user-defined type with 1,024 cylinders, 16 heads and 63 sectors.
12. Set LBA to Normal, Standard or Disabled. The Write Pre Comp (WpCom) and Landing Zone (LZ) options can be set to zero.
13. Save the settings, exit the configuration program and turn off the system.
14. Reconnect the power and ATA cables, restart the operating system from the installation saying and perform the normal installation procedure.
If SeaTools for DOS does not detect the drive and the above troubleshooting procedures have been followed, contact the motherboard manufacturer for a BIOS update or purchase an Ultra ATA PCI card. A full line of Ultra ATA PCI cards are available at Maxtor’s online store at provide support for high capacity drives.
• Hard drive failed
If all the above checks and procedures have been performed and problems continue while installing the drive or operating system, we recommend that you run the SeaTools for DOS diagnostic utility to determine if the drive is defective. . If SeaTools for DOS returns an error code, consult our Warranty and Returns Service.


Vuoi abilitare le notifiche?
Desiderate avere la possibilita’ di ricevere delle notifiche? Se si avrete la possibilita’ di essere sempre aggiornati con le nostre ultime proposte o notizie . Consigliamo l’adesione Grazie !
