-
Il BIOS viene preinstallato sulla scheda madre e viene aggiornato dal produttore della scheda. Il successore del BIOS è chiamato Unified Extensibile Firmware Interface o UEFI .
-
L’aggiornamento del BIOS è un’operazione complicata. Non interrompere il processo in quanto potrebbe causare più danni che è più difficile da riparare. Seguire attentamente i passaggi.
-
Se l’aggiornamento non ha risolto il problema che speravi, controlla la sezione BIOS sul sito per le guide su tutti i tipi di problemi.
È necessario aggiornare il BIOS?
Il flashing del BIOS è una procedura avanzata e, se non lo si esegue correttamente, è possibile causare gravi danni al PC. Nella maggior parte dei casi non è nemmeno necessario aggiornare il BIOS a meno che non ci sia un grosso problema con l’hardware. Il problema principale con il BIOS è che si trova su un chip sulla scheda madre e se il processo di aggiornamento non funziona correttamente non sarà possibile avviare Windows. Se non sei un utente avanzato non è necessario mantenere aggiornato il BIOS, ma se hai un problema hardware e l’unico modo per risolverlo è aggiornare il BIOS, potrebbe essere necessario aggiornarlo. Per eseguire correttamente un aggiornamento del BIOS, è necessario assicurarsi che il processo di aggiornamento non venga interrotto da interruzione dell’alimentazione o arresto imprevisto .
In tal caso, il processo di aggiornamento del BIOS non riuscirà e molto probabilmente causerai danni alla scheda madre.
Per evitare problemi, assicurarsi di collegare il laptop direttamente alla presa di corrente o utilizzare un UPS per il PC desktop . Sebbene l’aggiornamento del BIOS possa essere potenzialmente pericoloso, ci sono alcuni vantaggi dopo l’aggiornamento del BIOS. A volte l’aggiornamento del BIOS porta il supporto per il nuovo hardware, come il supporto per le nuove CPU. Un altro vantaggio dell’aggiornamento del BIOS è la stabilità migliorata e potenzialmente nuove funzionalità come l’ overclocking .
Come puoi vedere, non è necessario mantenere aggiornato il BIOS, soprattutto perché un aggiornamento improprio del BIOS può portare a molti altri problemi. Si consiglia di aggiornare il BIOS in caso di problemi hardware che potrebbero essere correlati al BIOS. Esistono diversi modi per aggiornare il BIOS e oggi ti mostreremo come farlo.
Passaggi per eseguire il flash BIOS su Windows 10:
-
Aggiornamento dal BIOS
-
Creare un’unità USB DOS
-
Utilizzare programmi basati su Windows
Prima di aggiornare il BIOS, è necessario scoprire quale versione si sta attualmente utilizzando. Il modo più semplice per farlo è utilizzare il prompt dei comandi o lo strumento Informazioni di sistema. Abbiamo già scritto di diversi metodi che è possibile utilizzare per controllare la versione del BIOS su Windows 10 , quindi assicurati di leggere l’articolo.Oltre alla versione BIOS, è necessario conoscere anche il modello della scheda madre . Puoi vedere il modello della tua scheda madre usando qualsiasi strumento di informazione hardware come Speccy o CPU-Z. Dopo aver trovato la versione del BIOS in uso, è necessario scaricare la nuova versione dal sito Web del produttore della scheda madre. Vai alla sezione Supporto o Download e seleziona il tuo modello di scheda madre. Assicurati di scaricare l’aggiornamento del BIOS per il modello esatto della scheda madre che stai utilizzando. L’installazione di una versione errata del BIOS sulla scheda madre può causare danni, quindi fai molta attenzione durante il download di una nuova versione del BIOS.Quasi tutte le versioni del BIOS hanno note di aggiornamento disponibili nella pagina di download in modo da poter vedere facilmente quali problemi risolve l’aggiornamento. Quando scarichi una nuova versione del BIOS, questa verrà archiviata in un archivio, quindi dovrai prima estrarla. Successivamente, controlla il file readme disponibile per istruzioni ed eventuali informazioni aggiuntive.
Esistono diversi modi per aggiornare il BIOS e li analizzeremo brevemente.
Soluzione 1 – Aggiornamento dal BIOS
Alcuni produttori di schede madri consentono di eseguire il flashing del BIOS semplicemente accedendo a esso e scegliendo l’opzione di aggiornamento. Questo è relativamente semplice e per farlo è necessario spostare l’aggiornamento del BIOS scaricato su un’unità flash USB .
Prima di spostare l’aggiornamento sull’unità USB, assicurarsi che non vi siano altri file disponibili sull’unità. Ora è necessario collegare l’unità flash USB al PC e accedere al BIOS. È possibile accedere al BIOS durante la sequenza di avvio premendo il tasto appropriato. Nella maggior parte dei casi si tratta di Canc o di un altro tasto F, quindi tieni d’occhio un messaggio che ti dice di premere un determinato tasto per accedere a SETUP.
Inoltre, puoi sempre controllare il manuale della scheda madre per vedere quale tasto devi premere per accedere al BIOS. Se non funziona, puoi accedere al BIOS seguendo questi passaggi:
-
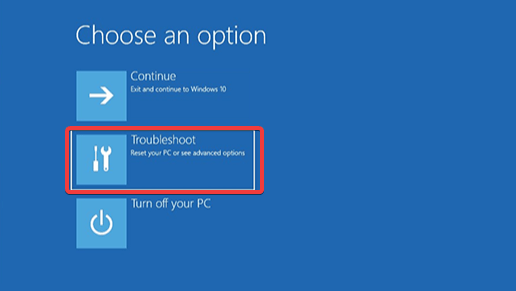
All’avvio di Windows 10, apri il menu Start e fai clic sul pulsante di accensione .
-
Tieni premuto il tasto Maiusc e scegli l’ opzione Riavvia .
-
Dovresti vedere diverse opzioni disponibili. Scegli Risoluzione dei problemi .
-
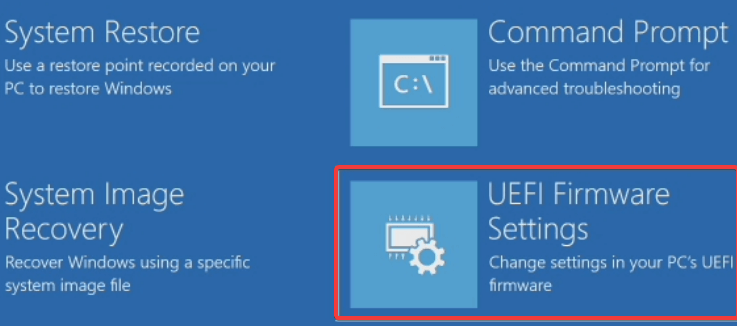
Ora seleziona Opzioni avanzate> Impostazioni firmware UEFI .
-
Fai clic sul pulsante Riavvia e il tuo computer dovrebbe ora avviarsi nel BIOS.
Una volta entrato nel BIOS, cerca l’opzione di aggiornamento del BIOS e selezionala. Ora devi scegliere il file di aggiornamento del BIOS dall’unità flash USB e attendere l’aggiornamento del BIOS. Alcuni produttori offrono strumenti che creeranno un’unità flash USB con tutti i file necessari, quindi non dovrai trasferirli manualmente. Tieni presente che il processo di aggiornamento è leggermente diverso per ogni modello di scheda madre, quindi assicurati di controllare il manuale di istruzioni per i dettagli su come aggiornare il BIOS.
Soluzione 2: creare un’unità USB DOS
Questo è un vecchio metodo di flashing del BIOS e probabilmente il più complicato. Questo processo richiede di creare un’unità flash USB avviabile e di copiare anche la nuova versione del BIOS sull’unità. Inoltre, avrai bisogno di uno script che esegua il flashing del BIOS. Questo file sarà di solito disponibile nell’archivio con l’aggiornamento del BIOS e avrà l’estensione .exe o .bat. In alcuni casi questo script dovrà essere scaricato separatamente. Per creare un’unità USB avviabile con sistema DOS , è necessario utilizzare strumenti di terze parti come Rufus . Basta formattare l’unità utilizzando questo strumento e assicurarsi di selezionare Crea un disco di avvio utilizzando l’ opzione FreeDOS . Dopo averlo fatto, trasferire il file di aggiornamento del BIOS e lo script di installazione sull’unità USB e riavviare il PC. Avviare il PC dall’unità USB ed eseguire lo script di installazione utilizzando DOS. Questa è una procedura avanzata, quindi ti consigliamo vivamente di controllare il manuale della scheda madre per istruzioni dettagliate su come farlo.
Soluzione 3: utilizzare programmi basati su Windows
Se l’utilizzo di DOS sembra troppo complicato per te, potresti prendere in considerazione l’uso di un’applicazione basata su Windows. Molti produttori di schede madri dispongono di applicazioni di aggiornamento del BIOS che consentono di aggiornare il BIOS utilizzando una semplice interfaccia grafica. Sebbene questo sia il modo più semplice per farlo, ci sono alcuni problemi con esso. Il software installato a volte può interferire con questo processo e causare errori nell’aggiornamento del BIOS. I programmi di sicurezza possono spesso interferire con il processo di aggiornamento del BIOS e causare la comparsa di tutti i tipi di problemi, quindi potrebbe essere meglio disabilitarli completamente durante il flashing del BIOS. Qualsiasi arresto anomalo o blocco del sistema potrebbe anche influire sul processo di aggiornamento, quindi potrebbe essere meglio utilizzare un metodo diverso per aggiornare il BIOS. I produttori di schede madri raccomandano spesso il metodo migliore per aggiornare il BIOS, quindi assicurati di utilizzare quel metodo. L’aggiornamento del BIOS non è un processo difficile, ma potrebbe essere potenzialmente pericoloso, quindi fai attenzione se decidi di aggiornare il BIOS. Inoltre, assicurati di ricontrollare tutto prima di iniziare. Molti strumenti di aggiornamento del BIOS ti daranno la possibilità di salvare o eseguire il backup del BIOS corrente, quindi assicurati di utilizzare questa funzione. Non è necessario aggiornare il BIOS, soprattutto perché è possibile causare danni irreversibili alla scheda madre se non lo si fa correttamente.
Tuttavia, se stai riscontrando un problema hardware e l’unica soluzione è aggiornare il BIOS, assicurati di leggere attentamente il manuale di istruzioni della scheda madre per vedere come aggiornare correttamente il BIOS. Alcuni produttori di computer come Asus, Lenovo o Dell offrono uno strumento integrato per l’aggiornamento del BIOS. Puoi sempre controllare il manuale del tuo PC per vedere se offre uno strumento del genere per rendere le cose un po ‘più facili.
FAQ: Ulteriori informazioni sull’aggiornamento del BIOS
-
Come verificare la versione del BIOS Windows 10?
Il modo più rapido è eseguire bios wmic ottenere smbiosbiosversion nel prompt dei comandi come amministratore. Ulteriori informazioni e altri modi sono in questo articolo sul controllo della versione del BIOS .
-
Devo aggiornare il mio BIOS?
Un BIOS riceve aggiornamenti per supportare componenti hardware più recenti o correggere bug. Se non si modifica la configurazione o si verificano errori, non è necessario eseguire questa operazione.
-
Quanto tempo richiede un aggiornamento del BIOS?
Dopo aver preparato il file o la chiavetta USB, una volta premuto il pulsante di aggiornamento, l’operazione è abbastanza rapida. Di solito ci vogliono circa 1-3 minuti.
The BIOS comes pre-installed on the motherboard and is updated by the board manufacturer. The successor of the BIOS is called the Unified Extensible Firmware Interface or UEFI.
Updating the BIOS is a complicated operation. Do not interrupt the process as it could cause more damage which is more difficult to repair. Follow the steps carefully.
If the update did not solve the problem you were hoping for, check the BIOS section on the site for guides on all types of problems.
Do I need to update the BIOS?
BIOS flashing is an advanced procedure and, if you do not do it correctly, you can cause serious damage to your PC. In most cases it is not even necessary to update the BIOS unless there is a big hardware problem. The main problem with the BIOS is that it is located on a chip on the motherboard and if the update process does not work properly it will not be possible to start Windows. If you are not an advanced user it is not necessary to keep the BIOS updated, but if you have a hardware problem and the only way to solve it is to update the BIOS, you may need to update it. To successfully perform a BIOS update, you must ensure that the update process is not interrupted by a power outage or unexpected shutdown.
If so, the BIOS update process will fail and you will most likely cause damage to the motherboard.
To avoid problems, be sure to connect the laptop directly to the power outlet or use a UPS for the desktop PC. Although updating the BIOS can be potentially dangerous, there are some advantages after updating the BIOS. Sometimes updating the BIOS brings support for new hardware, such as support for new CPUs. Another advantage of the BIOS update is improved stability and potentially new features such as overclocking.
As you can see, there is no need to keep the BIOS up to date, especially since an improper BIOS update can lead to many other problems. We recommend updating the BIOS in case of hardware problems that may be related to the BIOS. There are several ways to update the BIOS and today we will show you how to do it.
Steps to flash BIOS on Windows 10:
Update from the BIOS
Create a USB DOS drive
Use Windows-based programs
Before updating the BIOS, you need to find out which version you are currently using. The easiest way to do this is to use the command prompt or the System Information tool. We have already written about several methods that you can use to check the BIOS version on Windows 10, so be sure to read the article.In addition to the BIOS version, you also need to know the model of the motherboard. You can see your motherboard model using any hardware information tool like Speccy or CPU-Z. After finding the version of the BIOS in use, you need to download the new version from the motherboard manufacturer’s website. Go to the Support or Downloads section and select your motherboard model. Make sure to download the BIOS update for the exact model of the motherboard you are using. Installing an incorrect BIOS version on the motherboard can cause damage, so be very careful when downloading a new BIOS version. Almost all BIOS versions have update notes available on the download page so you can see easily which problems fix the update. When you download a new BIOS version, it will be stored in an archive, so you will need to extract it first. Next, check the readme file available for instructions and any additional information.
There are several ways to update the BIOS and we will analyze them briefly.
There are several ways to update the BIOS and we will analyze them briefly.
Solution 1 – Update from the BIOS
Some motherboard manufacturers allow you to flash the BIOS by simply accessing it and choosing the upgrade option. This is relatively simple and to do this you need to move the downloaded BIOS update to a USB flash drive.
Before moving the update to the USB drive, make sure there are no other files available on the drive. Now you need to connect the USB flash drive to the PC and enter the BIOS. The BIOS can be accessed during the boot sequence by pressing the appropriate key. In most cases it is Canc or another F key, so keep an eye on a message telling you to press a certain key to access SETUP.
Also, you can always check the motherboard manual to see which key you need to press to enter the BIOS. If it doesn’t work, you can access the BIOS by following these steps:
When Windows 10 starts, open the Start menu and click the power button.
Hold down the Shift key and choose the Restart option.
You should see several options available. Choose Troubleshoot.
Now select Advanced Options> UEFI Firmware Settings.
Click the Restart button and your computer should now boot into the BIOS.
Once in the BIOS, look for the BIOS update option and select it. Now you have to choose the BIOS update file from the USB flash drive and wait for the BIOS update. Some manufacturers offer tools that will create a USB flash drive with all the necessary files, so you won’t have to transfer them manually. Keep in mind that the update process is slightly different for each model of motherboard, so be sure to check the instruction manual for details on how to update the BIOS
Solution 2: create a USB DOS drive
This is an old BIOS flashing method and probably the most complicated. This process requires you to create a bootable USB flash drive and also copy the new BIOS version to the drive. In addition, you will need a script that flashes the BIOS. This file will usually be available in the archive with the BIOS update and will have the extension .exe or .bat. In some cases this script will have to be downloaded separately. To create a bootable USB drive with a DOS system, you need to use third-party tools such as Rufus. Just format the drive using this tool and be sure to select Create a bootable disc using the FreeDOS option. After doing so, transfer the BIOS update file and installation script to the USB drive and restart the PC. Boot the PC from the USB drive and run the installation script using DOS. This is an advanced procedure, so we strongly recommend that you check the motherboard manual for detailed instructions on how to do it.
Solution 3: use Windows-based programs
If using DOS seems too complicated for you, you may want to consider using a Windows-based application. Many motherboard manufacturers have BIOS update applications that allow you to update the BIOS using a simple graphical interface. Although this is the easiest way to do it, there are some problems with it. The installed software can sometimes interfere with this process and cause errors in updating the BIOS. Security programs can often interfere with the BIOS update process and cause all sorts of problems to appear, so it may be best to disable them completely during BIOS flashing. Any crash or freeze could also affect the update process, so it may be better to use a different method to update the BIOS. Motherboard manufacturers often recommend the best method to update the BIOS, so be sure to use that method. Updating the BIOS isn’t a difficult process, but it could be potentially dangerous, so be careful if you decide to update the BIOS. Also, be sure to double check everything before you start. Many BIOS update tools will give you the option to save or back up your current BIOS, so be sure to use this feature. It is not necessary to update the BIOS, especially since it is possible to cause irreversible damage to the motherboard if you do not do it correctly.
However, if you are having a hardware problem and the only solution is to update the BIOS, be sure to read the motherboard instruction manual carefully to see how to properly update the BIOS. Some computer manufacturers such as Asus, Lenovo or Dell offer an integrated BIOS update tool. You can always check your PC manual to see if it offers such a tool to make things a little easier.
FAQ: Learn more about updating the BIOS
How to check the Windows 10 BIOS version?
The quickest way is to run wmic bios to get smbiosbiosversion in the command prompt as an administrator. More information and other ways are in this article about checking the BIOS version.
Do I need to update my BIOS?
A BIOS receives updates to support newer hardware components or to fix bugs. If you don’t change the configuration or experience errors, you don’t need to do this.
How long does a BIOS update take?
After preparing the file or USB flash drive, once you have pressed the update button, the operation is quite rapid. Usually it takes about 1-3 minutes.