Cosa posso fare se il Wi-Fi è collegato ma non c’è accesso a Internet?
-
Riavvia il tuo computer
-
Riavvia il modem e il router Internet
-
Assicurati di connetterti alla rete corretta
-
Immettere nuovamente la password wireless
-
Esegui comandi nel Prompt dei comandi
-
Usa risoluzione dei problemi di rete di Windows
-
Aggiorna il driver della scheda di rete
-
Ripristina DNS
-
Disattiva temporaneamente il tuo software di sicurezza
-
Disattiva temporaneamente il firewall
Uno dei problemi più fastidiosi relativi al Wi-Fi è che il tuo dispositivo mostra barre Wi-Fi complete, ma la tua connessione Internet non funziona ancora. Non preoccuparti perché questa è una situazione piuttosto comune. Di seguito puoi trovare alcune soluzioni efficaci per affrontare questa situazione.
Perché il mio computer è connesso al Wi-Fi ma non a Internet?
1. Riavvia il computer
Questo può sembrare un suggerimento inutile, ma molti misteriosi problemi informatici possono essere risolti semplicemente riavviando Windows. Un semplice ripristino cancella le impostazioni che potrebbero causare i problemi di connettività e, se non aiuta, impiega comunque solo un minuto. Dopo il riavvio del computer:
-
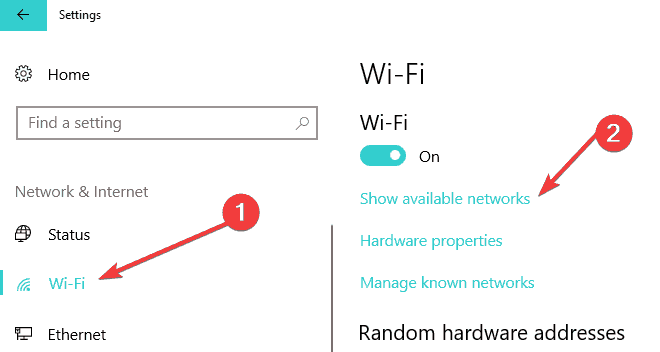
Fai clic sul pulsante Start e vai su Impostazioni
-
Passa a Rete e Internet e scegli Wi-Fi (sul lato sinistro del riquadro)
-
Seleziona la connessione di rete che hai e fai clic su Connetti .
2. Riavvia il modem e il router Internet
Un altro semplice passo che potrebbe risolvere completamente il tuo problema è scollegare sia il modem che il router dalle fonti di alimentazione, attendere alcuni secondi e ricollegarli. Il riavvio del router e del modem cancella il contenuto della memoria e aiuta a ripristinare qualsiasi sfondo o persistere i problemi.
3. Assicurarsi di connettersi alla rete corretta
Assicurati che il tuo dispositivo Wi-Fi non stia tentando di raggiungere una rete della porta accanto perché anche se il Wi-Fi è attivo e connesso, potresti non avere ancora Internet funzionante. Per verificarlo, apri le impostazioni Wi-Fi e controlla il nome della rete a cui stai tentando di connetterti. Se non lo riconosci, probabilmente non è la tua rete.
Inoltre, se il tuo dispositivo è connesso a un servizio VPN , potresti vedere una connessione Wi-Fi completa ma nessuna connettività Internet. In questo caso, prova un altro server VPN o disconnettiti completamente dalla VPN per vedere se questo risolve il problema.
4. Immettere nuovamente la password wireless
Alcuni sistemi operativi non ti avviseranno se inserisci una password wireless errata. Il tuo computer potrebbe mostrare che hai un forte segnale Wi-Fi ma se la password non è corretta, il router rifiuterà di comunicare correttamente con il tuo dispositivo. Se si utilizza un laptop su un hotspot Wi-Fi pubblico , assicurarsi che la password sia corretta. Potresti utilizzare una vecchia password che funzionava ma che è cambiata nel frattempo.
5. Eseguire i comandi nel prompt dei comandi
La prossima soluzione che potresti provare è eseguire i comandi seguenti nel Prompt dei comandi. Per fare ciò, seguire i passaggi seguenti:
-
Nella casella di ricerca sulla barra delle applicazioni, digitare Prompt dei comandi
-
Fare clic con il pulsante destro del mouse su Prompt dei comandi , quindi selezionare Esegui come amministratore
-
Nel prompt dei comandi , eseguire i comandi seguenti nell’ordine elencato e premere Invio dopo ciascun comando:
-
netsh winsock ripristinato
-
netsh int ip reset
-
ipconfig / release
-
ipconfig / rinnova
-
ipconfig / flushdns
Potrebbe essere necessario riavviare il computer per rendere effettive le modifiche.
6. Utilizzare lo strumento di risoluzione dei problemi di rete di Windows
Puoi anche utilizzare lo strumento di risoluzione dei problemi di rete di Windows integrato per vedere cosa sta causando il problema e risolverlo automaticamente:
-
Digita Network Troubleshooter nella casella di ricerca accanto al pulsante Start
-
Fai clic su Identifica e ripristina connessioni di rete dall’elenco visualizzato
-
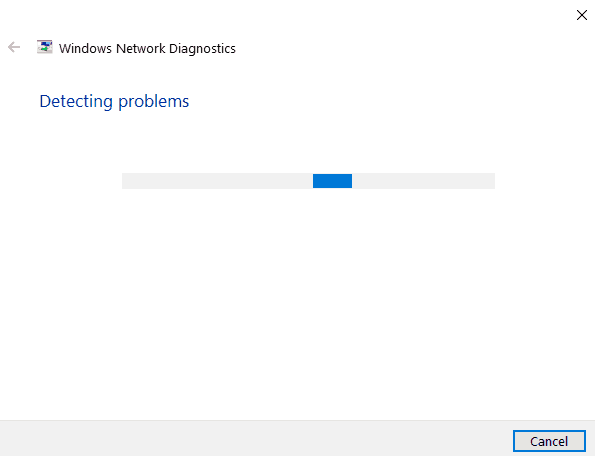
La rete di risoluzione dei problemi di Windows avrà inizio
-
La procedura guidata ti guiderà attraverso i passaggi per risolvere il problema di connessione
7. Aggiornare il driver della scheda di rete
Il Wi-Fi non funzionante potrebbe probabilmente essere causato da un driver di rete mancante o obsoleto , quindi controlla se è disponibile un driver aggiornato:
-
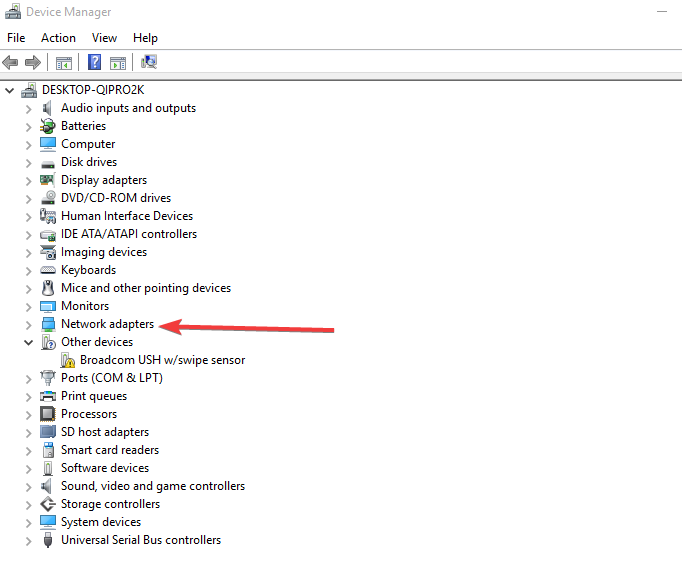
Nella casella di ricerca sulla barra delle applicazioni, digitare Gestione dispositivi , quindi selezionare Gestione dispositivi dall’elenco dei risultati.
-
Seleziona Schede di rete
-
Fare clic con il tasto destro del mouse sulla scheda di rete, quindi selezionare Aggiorna driver
-
Scegli Cerca automaticamente il software driver aggiornato e segui i passaggi
-
Riavvia il tuo computer
Se Windows non riesce a trovare un nuovo driver per la scheda di rete, visitare il sito Web del produttore del PC e scaricare il driver della scheda di rete più recente da lì. Se il computer non è in grado di connettersi a Internet, è possibile scaricare un driver su un altro computer e salvarlo su un’unità flash USB , al fine di installare manualmente il driver sul PC. Per fare ciò, dovrai conoscere il produttore o il nome del modello del tuo computer. Dopo aver scaricato i driver:
-
Nella casella di ricerca sulla barra delle applicazioni, digitare Gestione dispositivi , quindi selezionare Gestione dispositivi dall’elenco dei risultati.
-
Seleziona Schede di rete
-
Fare clic con il tasto destro del mouse sulla scheda di rete, quindi selezionare Aggiorna driver
-
Scegli Cerca nel mio computer il software del driver
-
Selezionare Sfoglia, quindi selezionare la posizione in cui sono archiviati i file del driver e premere OK
-
Selezionare Avanti e seguire i passaggi per installare il driver
-
Riavvia il tuo computer
8. Ripristina DNS
Un’altra soluzione che puoi provare è reimpostare il DNS seguendo i passaggi seguenti:
-
Fare clic con il tasto destro sull’icona della connessione di rete nell’angolo in basso a destra e fare clic su Apri Centro connessioni di rete e condivisione
-
Fai clic su Modifica impostazioni adattatore
-
Fare clic con il tasto destro del mouse sull’adattatore Wi-Fi e fare clic su Proprietà
-
Selezionare Internet Protocol versione 4 (TCP / IPv4) e fare clic su Proprietà
-
Fai clic su Ottieni automaticamente un indirizzo IP
-
Se non riesci ancora a connetterti a Internet, seleziona Utilizza i seguenti indirizzi del server DNS e inserisci gli indirizzi:
-
Server DNS preferito: 8.8.8.8
-
Server DNS alternativo: 8.8.4.4
-

9. Disattiva temporaneamente il software di sicurezza
Il problema può essere causato anche da interferenze con il software di sicurezza . Per vedere se è così, spegni temporaneamente il tuo software di sicurezza e controlla se il problema è stato risolto. Consultare la documentazione del software per istruzioni su come disabilitarlo. Se ciò risolve il problema, contattare il fornitore del software di sicurezza e chiedere loro consigli o installare un altro programma di sicurezza.
Nota : mentre il tuo software di sicurezza è disabilitato, fai molta attenzione a quali siti visiti, quali e-mail apri e quali file scarichi mentre il tuo computer è molto vulnerabile. Assicurati di riaccendere il tuo software antivirus appena puoi per assicurarti che il tuo computer sia meglio protetto.
10. Disattiva temporaneamente il firewall
Windows viene fornito con un’applicazione firewall integrata. Consente o blocca il traffico in entrata e in uscita per proteggerti da contenuti dannosi. Tuttavia, a volte, può bloccare l’accesso al web per l’intero computer. La soluzione seguente funziona sia per l’app firewall nativa che per tutte le app firewall di terze parti in esecuzione:
-
Apri il menu Start e digita il prompt dei comandi
-
Fare clic con il tasto destro del mouse sul collegamento in alto e selezionare Esegui come amministratore
-
Digitare netsh advfirewall per disattivare tutti i profili e premere Invio
-
Verifica se l’accesso a Internet ora funziona
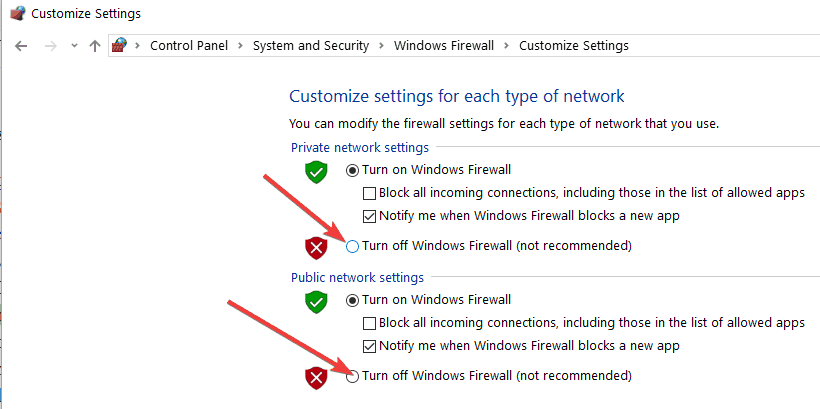
Allo stesso modo, per riattivare i firewall, tornare al prompt dei comandi e digitare netsh advfirewall impostare lo stato di tutti i profili . Se stai utilizzando il firewall integrato di Windows 10, puoi disabilitarlo direttamente dal Pannello di controllo come mostrato nella schermata qui sotto.
Tutto sommato, queste sono alcune delle soluzioni alternative che è possibile utilizzare se il Wi-Fi appare connesso ma Internet non funziona. Facci sapere quale di questi metodi ti ha aiutato a risolvere il tuo problema.
What can I do if Wi-Fi is connected but there is no internet access?
-
Restart your computer
-
Restart your internet modem and router
-
Make sure you connect to the correct network
-
Re-enter the wireless password
-
Run commands in Command Prompt
-
Use Windows Network Troubleshooter
-
Update the network adapter driver
-
Reset DNS
-
Temporarily turn off your security software
-
Temporarily turn off your Firewall
One of the most annoying problems regarding Wi-Fi is your device showing full Wi-Fi bars yet your Internet connection is still not working. Do not worry as this is a rather common situation. Below you can find some effective solutions to walk through if you are facing this situation.
Why is my computer connected to Wi-Fi but not the internet?
1. Restart your computer
This may seem like a useless suggestion, but many mysterious computer problems can be solved by simply restarting Windows. A simple reset will clear out the settings which could be causing your connectivity issues, and if it does not help, it only took a minute anyway. After your computer restarts:
-
Click the Start button and go to Settings
-
Navigate to Network & Internet and choose Wi-Fi (on the left side of the pane)
-
Select the network connection you have and click Connect.
2. Restart your Internet modem and router
Another easy step that could totally fix your problem is unplugging both your modem and your router from their power sources, waiting for a few seconds, and plugging them back in. Restarting the router and modem flushes the memory contents and helps reset any background or lingering problems.
3. Make sure you connect to the correct network
Make sure your Wi-Fi device is not trying to reach a network next door because even if Wi-Fi is on and connected, you might still not have working internet. To verify this, open the Wi-Fi settings and check the network name you are trying to connect to. If you do not recognize it, then it is probably not your network.
Also, if your device is connected to a VPN service, you might see a full Wi-Fi connection but no internet connectivity. In this case, try a different VPN server or disconnect from the VPN completely to see if that fixes the problem.
4. Re-enter the wireless password
Some operating systems will not warn you if you put in the wrong wireless password. Your computer might show that you have a strong Wi-Fi signal but if the password is incorrect, the router will refuse to properly communicate with your device. If you are using a laptop on a public Wi-Fi hotspot, make sure the password is correct. You might be using an old password that used to work but has changed meanwhile.
5. Run commands in Command Prompt
The next solution you could try is running the commands below in Command Prompt. In order to do this, please follow the steps below:
-
In the search box on the taskbar, type Command prompt
-
Right-click Command prompt, and then select Run as administrator
-
In the Command prompt, run the following commands in the listed order and press Enter after each command:
-
netsh winsock reset
-
netsh int ip reset
-
ipconfig /release
-
ipconfig /renew
-
ipconfig /flushdns
You may need to restart your computer for the changes to take effect.
6. Use Windows Network Troubleshooter
You can also use the built-in Windows Network Troubleshooter to see what is causing the problem and to fix it automatically:
-
Type Network Troubleshooter in the search box next to Start button
-
Click on Identify and Repair Network Connections from the list that appears
-
The Windows Network Troubleshooter will start
-
The wizard will lead you through steps to troubleshoot the connection problem
7. Update the network adapter driver
Wi-Fi not working can probably be caused by missing or outdated network driver, so check to see if an updated driver is available:
-
Tn the search box on the taskbar, type Device Manager, and then select Device Manager from the list of results.
-
Select Network adapters
-
Right-click the network adapter, and then select Update driver
-
Choose Search automatically for updated driver software and follow the steps
-
Restart your computer
If Windows cannot find a new driver for your network adapter, visit the PC manufacturer’s website and download the latest network adapter driver from there. If your computer cannot connect to the Internet, you can download a driver on a different computer and save it to a USB flash drive, in order to manually install the driver on your PC. In order to do this, you will need to know your computer’s manufacturer and model name or number. After you downloaded the drivers:
-
In the search box on the taskbar, type Device Manager, and then select Device Manager from the list of results.
-
Select Network adapters
-
Right-click the network adapter and then select Update driver
-
Choose Browse my computer for driver software
-
Select Browse and then select the location where the driver files are stored and press OK
-
Select Next and follow the steps to install the driver
-
Restart your computer
-
RELATED: Fix: Windows 10 Can’t Connect To This Network
8. Reset DNS
Another solution you can try is resetting the DNS by following the steps below:
-
Right-click the network connection icon at the bottom right corner and click Open Network and Sharing Center
-
Click Change adapter settings
-
Right-click your Wi-Fi adapter and click Properties
-
Select Internet Protocol Version 4 (TCP/IPv4) and click Properties
-
Click Obtain an IP address automatically
-
If you still cannot connect to the internet, select Use the following DNS server addresses and fill in the addresses:
-
Preferred DNS server: 8.8.8.8
-
Alternate DNS server: 8.8.4.4
-
9. Temporarily turn off your security software
Your problem can be also caused by interference with your security software. To see if that is the case, temporarily turn off your security software and check if the problem is solved. Consult your software documentation for instructions to disable it. If this solves the problem, contact the vendor of your security software and ask them for advice, or install a different security program.
Note: While your security software is disabled, be extra careful what sites you visit, what emails you open and what files you download as your computer is very vulnerable. Make sure you turn your antivirus software back on as soon as you can to make sure your computer is better protected.
10. Temporarily turn off your Firewall
Windows comes with a built-in firewall application. It either permits or blocks incoming and outgoing traffic to help protect you against malicious content. However, sometimes, it can block web access for your entire computer. The solution below works for both the native firewall app as well as any third-party firewall apps you are running:
-
Open the Start menu and type Command Prompt
-
Right-click on the top link and select Run as administrator
-
Type netsh advfirewall set allprofiles state off and press Enter
-
Test whether internet access is now working